Mennonite Meat Buns with Lentils (budget freezer lunch)
These homemade stuffed meat buns are a freezer-friendly school lunch made with ground beef and lentils wrapped in soft, fluffy dough. The lentils stretch the beef into a bigger batch and add fibre, while the beef boosts the iron. It's a fun recipe to make with kids, and the buns pack well cold, so there's no reheating at school.
This post may contain affiliate links.
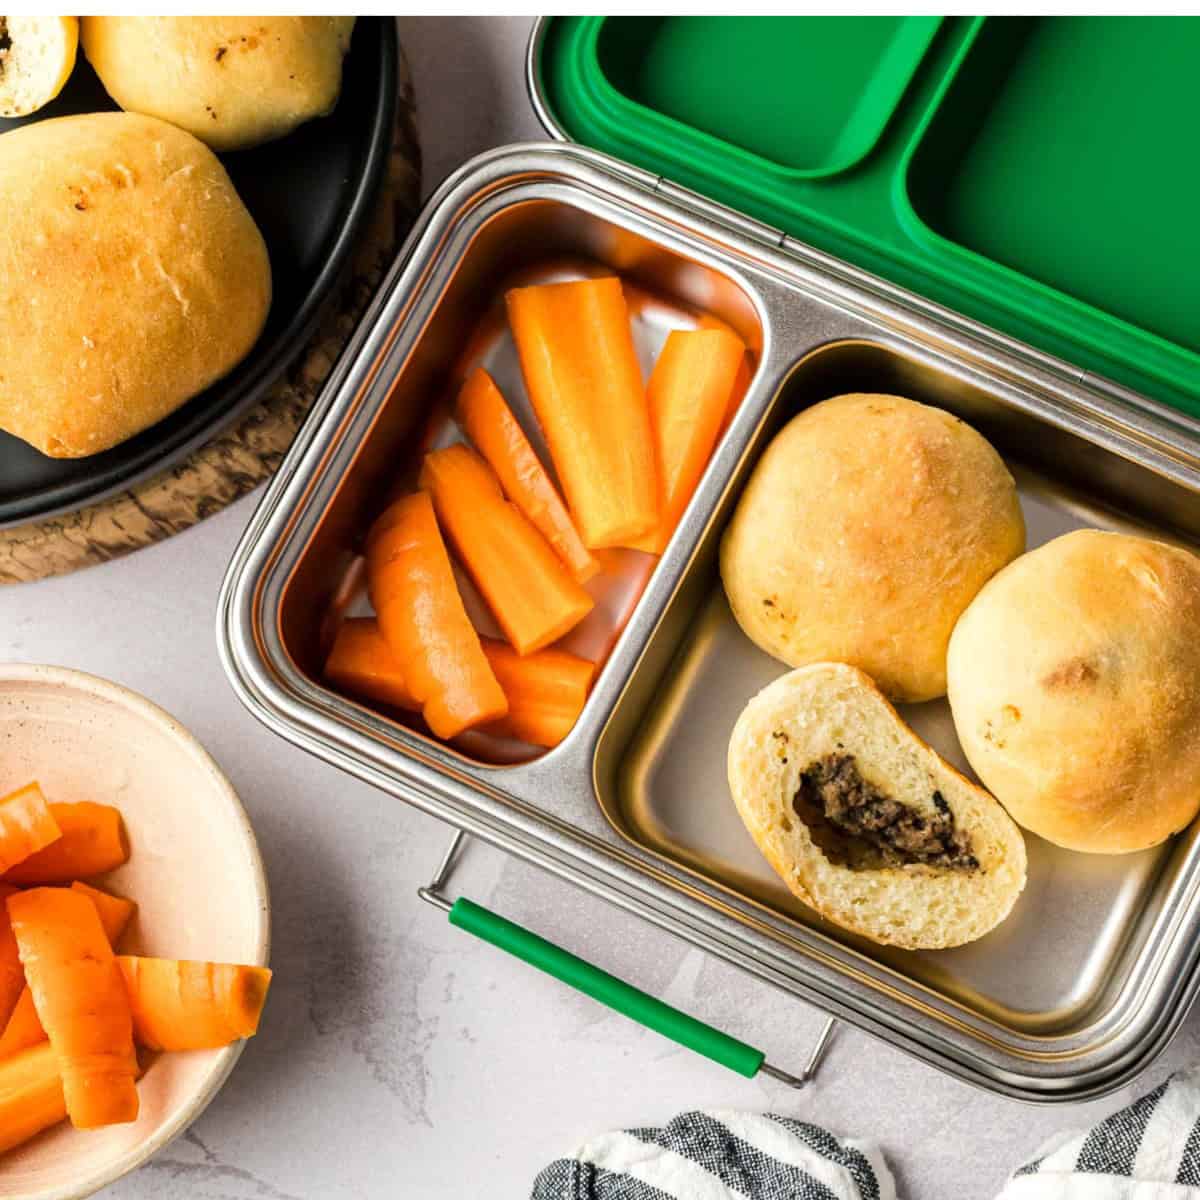
This post was written in paid partnership with ThinkBeef.ca. As always, all opinions are our own.
Some foods stick with you long after childhood. For Jessica, these stuffed meat buns were one of them. She loved them growing up, but they weren't something her family ever made at home. So when she had her own boys, she decided it was time to bring this childhood favourite into her kitchen-and share it with them. Now, more often than not, her freezer usually has a few dozen meat buns in it!
We'll be honest: these buns are a bit of a project-similar to the homemade animal oat crackers we've shared in the past.
There's filling to cook, dough to make, buns to shape and plenty of hands-on time involved. BUT none of the steps are particularly complicated, which means it's a great one to make with kids. Bonus: there are tons of benefits to getting kids in the kitchen early!
Jessica's family lovingly calls these sessions Meat Bun & Movie Marathons… except she learned the hard way that putting a movie on is too much of a visual distraction, so she has since switched to audio books. It's too bad 'audio book' doesn't alliterate with meat buns. Sigh, you can't win them all!
When Nita made these for her own boys, the recipe was completely new to them. Stuffed meat buns? Her kids are used to samosas and stuffed roti, so not a completely a foreign concept! But one bite was all it took-they loved them.
Before you get into these buns, do you need more fun baking recipes to turn to? Try this healthy applesauce cake or these make a batch of these carrot zucchini muffins!
Recipe Overview: Mennonite Meat Buns with Lentils
❄️Freezer friendly and makes a big batch just like the fluffy cheddar egg muffins
💪🏾 9g of protein and 2 mg iron for a two bun serving
🎒 Great for lunchboxes and quick dinners
♥️ Fun family activity, get your child into the kitchen to help make them
💰 Budget conscious
SUMMARIZE AND SAVE THIS CONTENT ON:
Jump to:
- Recipe Overview: Mennonite Meat Buns with Lentils
- What are fleish perishky?
- Make ahead lunches
- Freezer meals on a budget
- The meat factor
- Key ingredients
- Allergen information and substitutes
- How to make Mennonite Meat Buns (aka fleish perishky)
- How to serve meat buns at each stage
- Mennonite Meat Buns with Lentils FAQs:
- More "meat factor" recipes
- Mennonite Meat Buns with Lentils
What are fleish perishky?
We've been calling this recipe by their English translation, but they're truly an adaptation of fleish perishky, the Plautdietsch (aka Low German, ie: heritage language of Russian Mennonites) word.
For a very quick heritage lesson, the Mennonites are descended from a group of people in what is now The Netherlands, Switzerland, and Southern Germany who branched away from the mainstream church in the 1500s. They practiced baptism upon the confession of faith, pacifism, and plain living, and they were persecuted for it. That persecution kept them moving, first from the Netherlands to Prussia, then in the late 1700s to colonies in what is now southern Ukraine, and eventually to Manitoba and around the world.
Many of the "Mennonite" dishes come from those stops along the way. Fleish perishky is most likely a Mennonite take on Ukrainian meat buns, known as pyrizhky, from when Dutch Mennonites lived in colonies in Ukraine from the late 1700s until the emigrations of the 1870s and 1920s. The Ukrainian version is often fried and comes with all kinds of fillings, sweet and savoury. The Mennonite version settled into a baked, meat-filled bun on a rich, slightly sweet dough.
Make ahead lunches
These meat buns are a great option for school-lunches. Beef is a source of iron; a nutrient that is essential for children's brain development and learning. If you know us, we've never shied away from talking about how important iron is for growing children! Add in the iron found in the flour and lentils, and a serving of two buns will provide 9g of protein and 2mg iron.
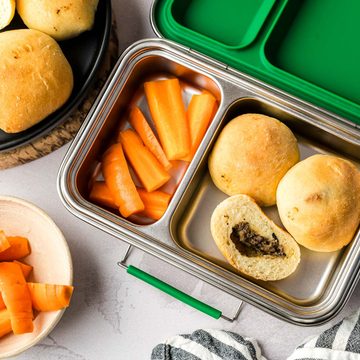
You'll end up with ~75 buns, so make room in your freezer! After that, lunch prep is easy: toss a couple straight from the freezer into your child's lunch box, wrapped in a paper towel to absorb condensation as they thaw. Add an ice pack and use an insulated lunch bag.
If you're eager to offer your child the range of nutrients they need for learning, you'll love the recipes in this Pack it with Protein resource developed by our friends at Think Beef. We love the cheeseburger pin wheels and all of the helpful nutrition information!

Freezer meals on a budget
You don't need an expensive cut of beef to make these. Ground beef is an economical choice that works beautifully in the filling, making these hearty buns a budget-friendly option. Additionally, we've cooked in lentils to stretch ground beef further plus add fibre, protein, and plant-based iron.
At the time of writing (Winnipeg prices in September 2026), we've calculated that it costs about $20 to make this whole batch of meat buns! That comes out to ~50 cents for two buns!
The meat factor
This recipe gets iron from three places: beef, lentils, and enriched all-purpose flour. The latter two contain non-heme iron, which is harder for the body to absorb than the iron in beef. But research has found that thanks to the "meat factor," eating plant-based sources alongside beef can help increase the absorption of non-heme iron!
You might be wondering… "will I/my kids taste the lentils?" and we can confidently state that you won't even notice they're there! Lentils are very mild tasting and they end up kind of "melting" into the meat mixture so you can't even see them. The bold taste of the beef, mushrooms, onion, and seasoning are the dominant flavour.
Key ingredients
MEAT FILLING INGREDIENTS
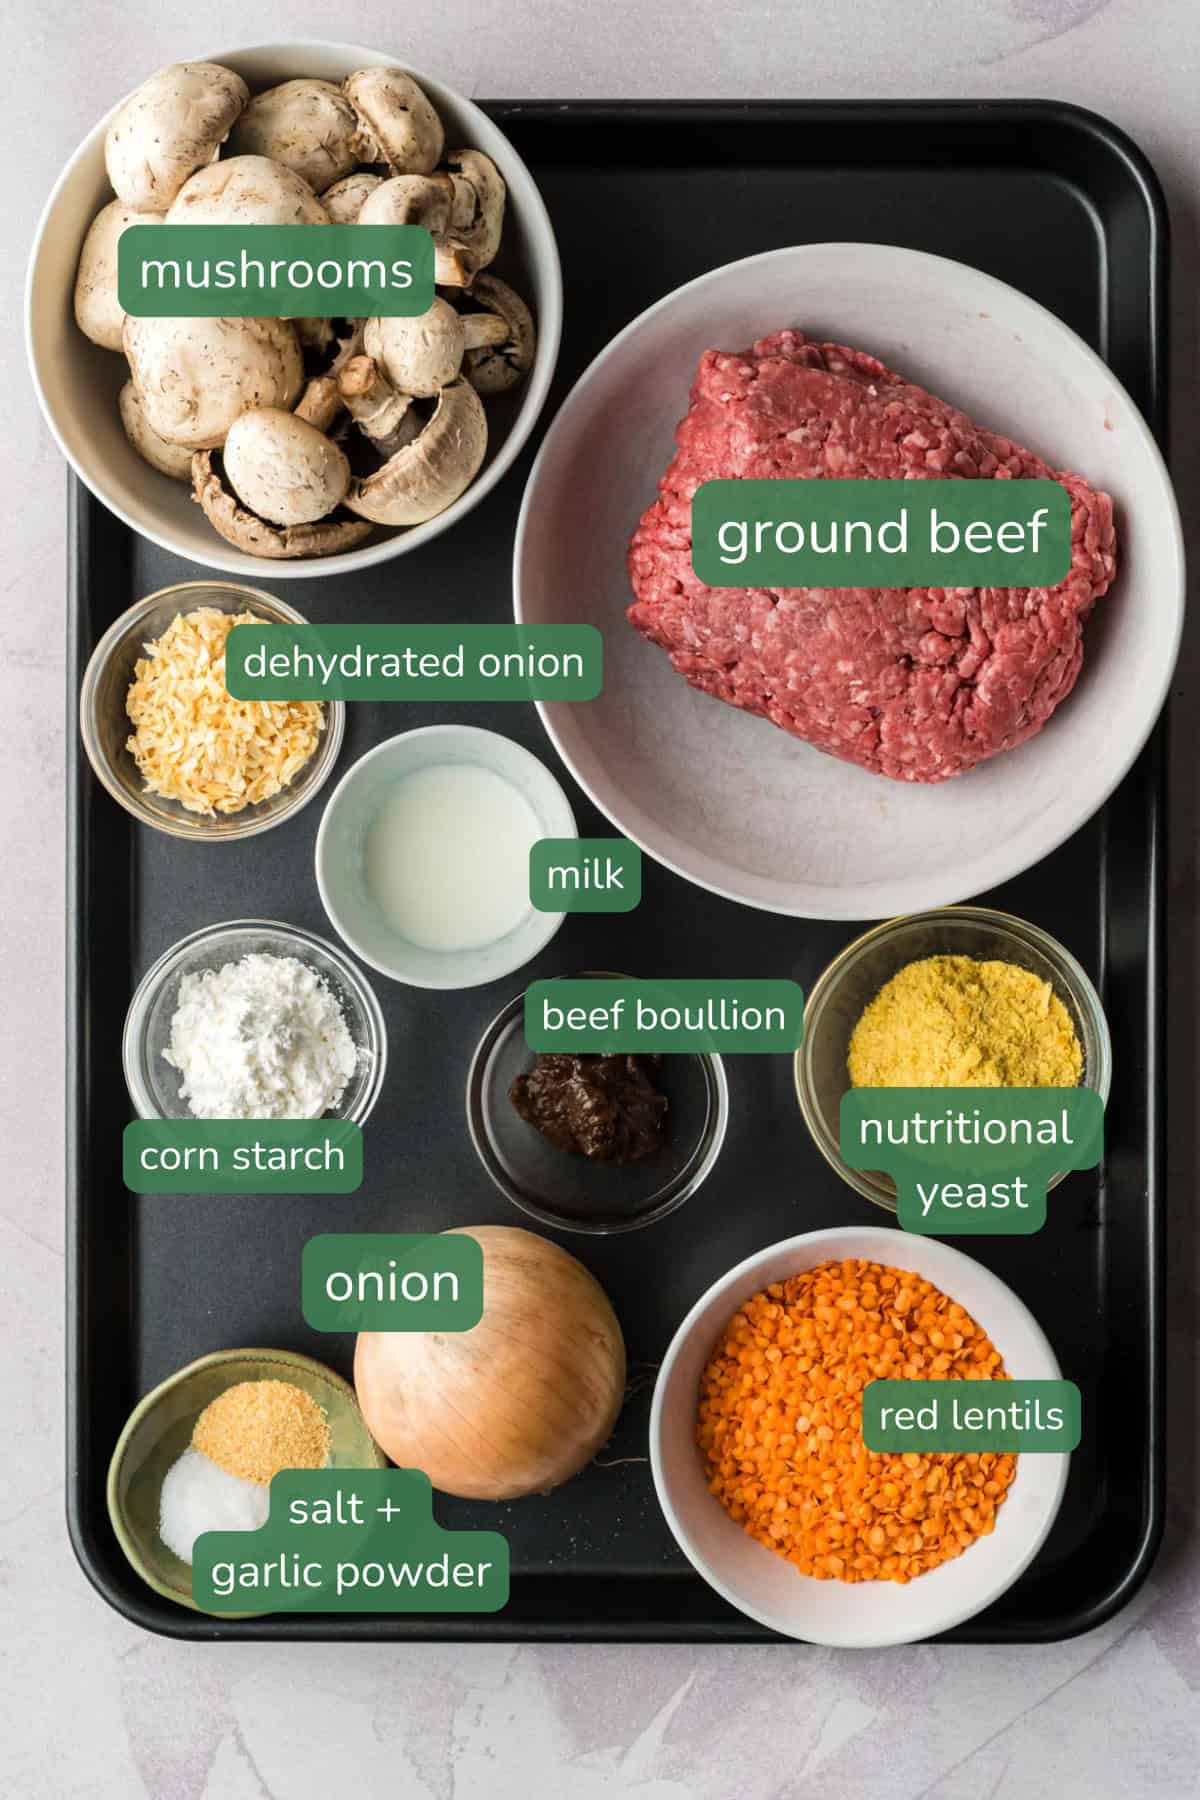
Ground beef
Look for lean or extra lean ground beef when shopping. We specifically chose beef because it's a source of iron for growing children.
Red lentils
You'll be looking for dried split red lentils when shopping at the grocery store. This variety of lentil cooks up fast and doesn't require any soaking! Bonus - you're adding fibre to these delicious meat buns without anyone really noticing.
Mushroom
Choose button (white) or cremini - you'll be giving these a fine chop so they blend in well with the beef.
Onion
Look for yellow or sweet white onion for this recipe.
Nutritional yeast
To help offer an umami flavour, we're using nutritional yeast! If you don't have this at home or it's tricky to source at your local grocery store, it's okay to omit it.
Beef bouillon
We're using the Better Than Bouillon to add more flavour to the beef and lentil mixture. See the note in the allergen section if you need to avoid soy.
Dehydrated chopped onion
This isn't just for flavour. Dried onion absorbs moisture as the filling simmers, which helps get you to a thick, scoopable texture. Don't swap it for more fresh onion, which adds water rather than taking it away.
Cornstarch
Mixed with a little milk so that it doesn't seize up when added to the hot mixture, cornstarch binds up any remaining moisture. A wet filling is the main reason meat buns leak in the oven, so this step matters a lot.
DOUGH INGREDIENTS
Milk
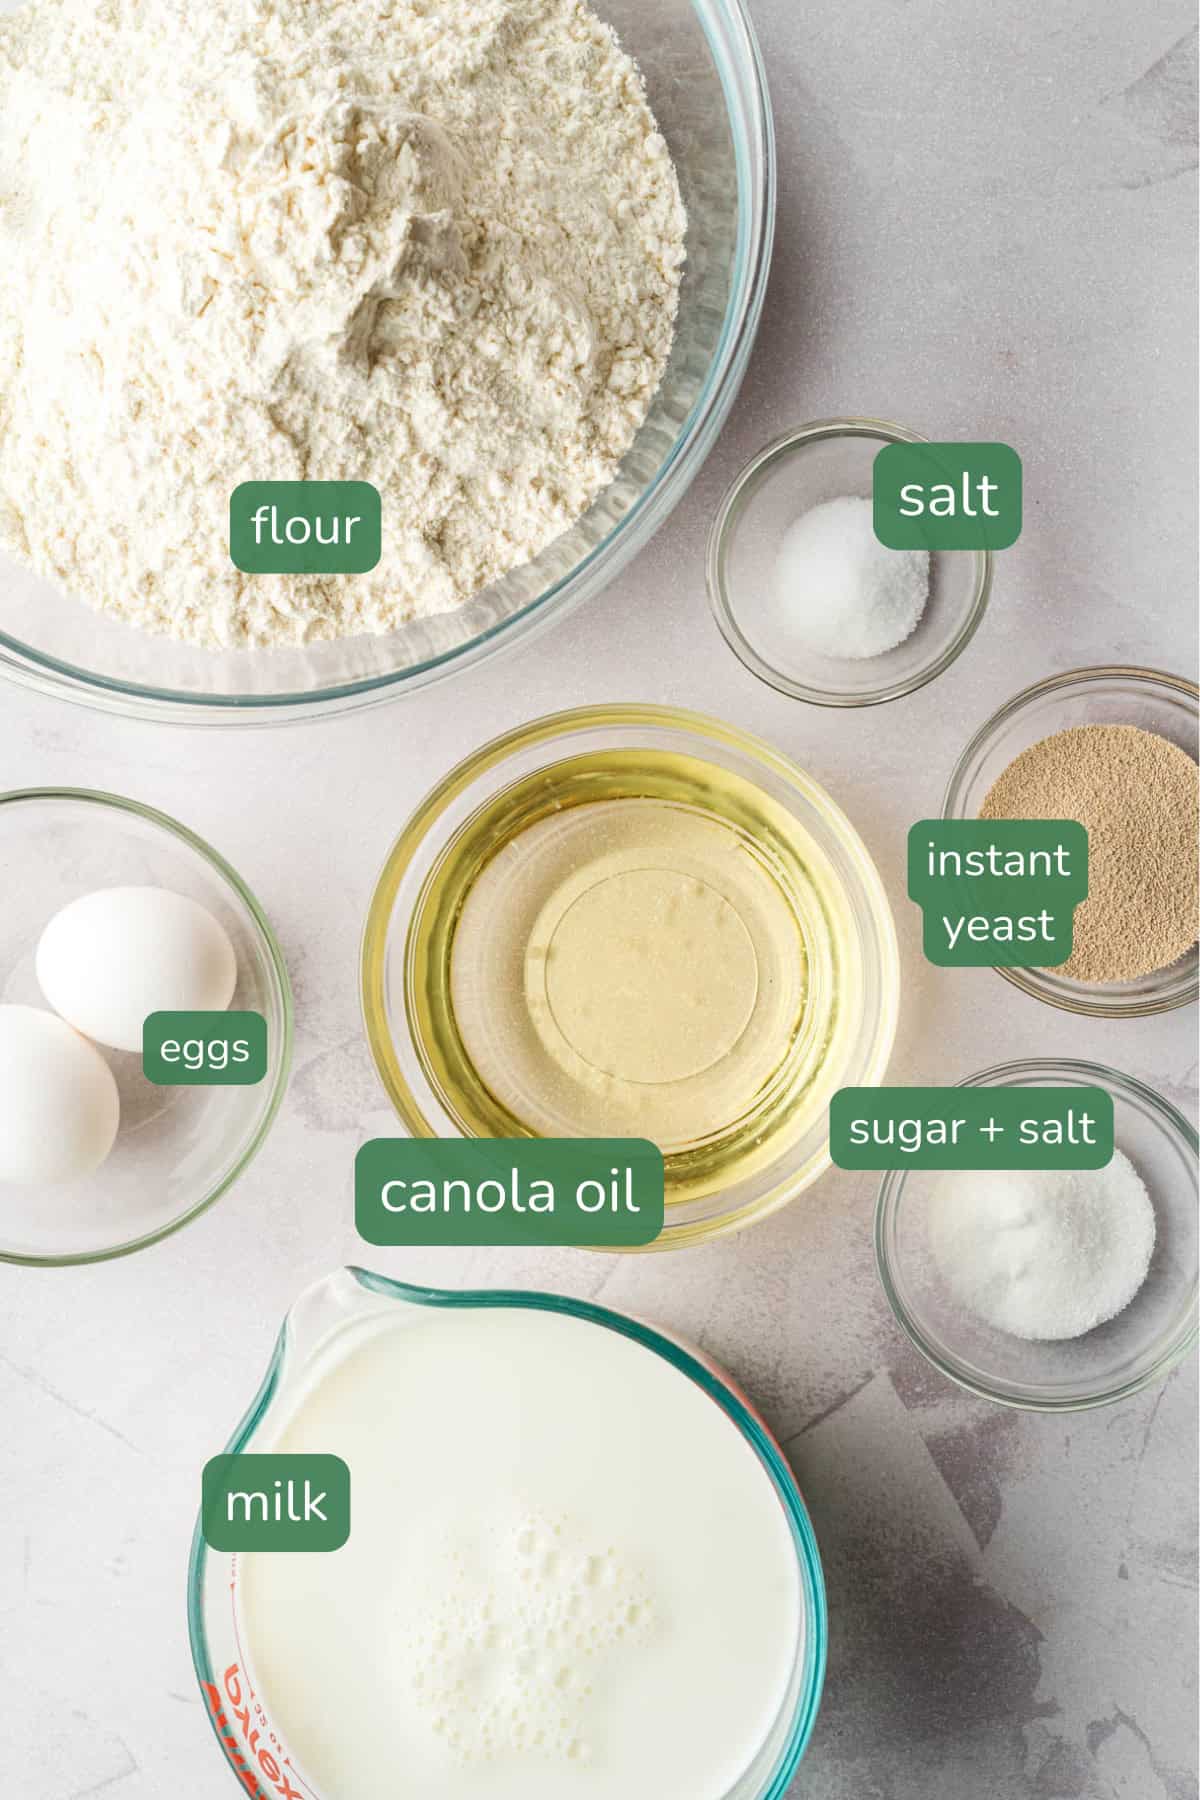
Warm milk will help activate the yeast and create a soft, tender dough. Heat it until very warm, like bath water-you can easily use a microwave for this.
Oil
A neutral tasting oil, such as canola, keeps the dough soft and moist without adding much flavour. Avocado oil, olive oil, or other oils that are liquid at room temperature will also work.
Instant Yeast
Instant yeast can be mixed directly into the flour, making it an easy choice for this recipe. While we haven't tested it ourselves, if you only have active dry yeast, use 2½ tablespoon instead. Set aside ½ cup of the warm milk, stir in 1 teaspoon of the sugar, sprinkle the yeast over top, and let it sit until foamy, about 5 to 10 minutes. Then add it to the bowl with the rest of the wet ingredients and continue as written. The rise may take a little longer.
All-Purpose Flour
All-purpose flour works perfectly here. Start with 8 cups and add more as needed until you have a soft, workable dough that isn't too sticky.
Allergen information and substitutes
This recipe for Mennonite meat buns contains several top priority allergens according to Health Canada including: wheat, dairy, eggs, and soy.
To prepare the buns without wheat, source a gluten free dinner bun recipe.
If you or your child lives with cow's milk protein allergy, then swap the milk in both the buns and the meat filling for a dairy free alternative.
Eggs are key to making this dough rich. You could try sourcing a vegan dinner bun recipe instead.
Soy is found in the Better Than Beef bouillon. Source an alternate soy-free bouillon as needed.
Eager to learn more about allergens and how to offer them to your baby? At Happy Healthy Eaters, we share the most current allergen guidance inside our Start Solids Confidently video lesson.
How to make Mennonite Meat Buns (aka fleish perishky)
The full recipe is below and we strongly encourage you to watch the video to understand how to make and form the meat buns since this recipe involves several steps!
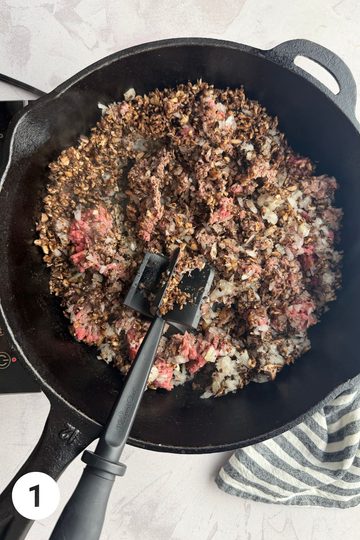
Step #1: In a large (12 inch+) skillet, add mushrooms, onions, ground beef, garlic powder, and salt. Crumble fry on medium heat until the ground beef is cooked through.
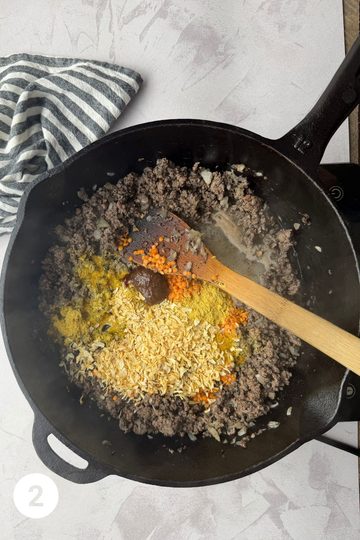
Step #2: Add the lentils, ¾ cup water, dehydrated chopped onion, nutritional yeast, and beef bouillon paste. Cover and simmer.
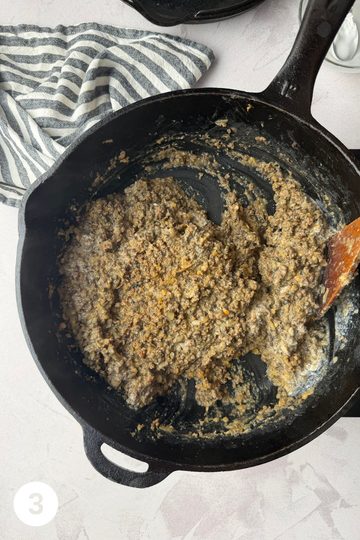
Step #3: Once the lentils are cooked and most of the moisture has cooked away (the mixture is thick and paste-like, not soupy), stir in the milk/cornstarch slurry and cook until the filling has thickened. IMPORTANT: transfer the cooked mixture to a shallow dish to cool in the fridge while you prepare the dough. If you try to add hot meat to the dough, it won't seal!
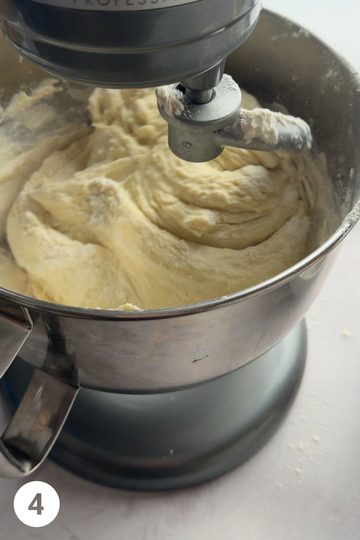
Step #4. Prepare the dough using a stand mixer and the kneading hook. See the full recipe for details, but you'll need to add a certain measure of flour and then add a few tablespoons at a time until you get a dough that's still tacky, but doesn't stick to your fingers.
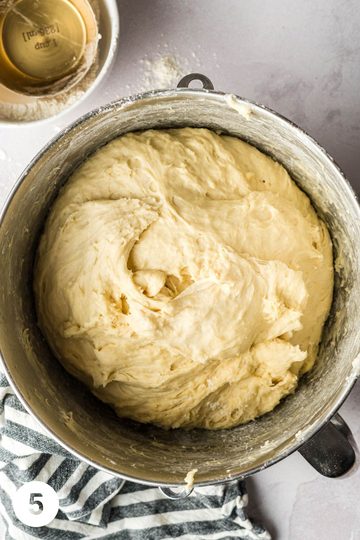
Step #5: Cover the bowl with a tea towel. Allow to rise on the counter until doubled (about 45-60 minutes).
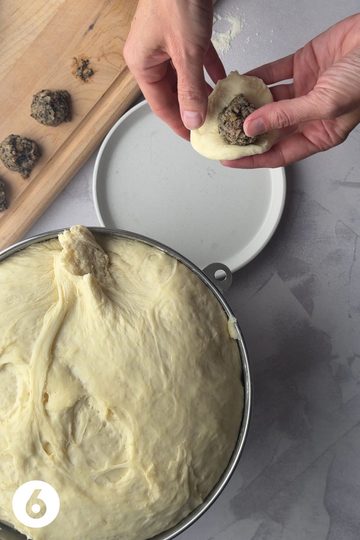
Step #6. Time to make the meat buns! Place a scoop of filling in the centre of the flattened dough and pull the dough up and around and pinch together to seal.
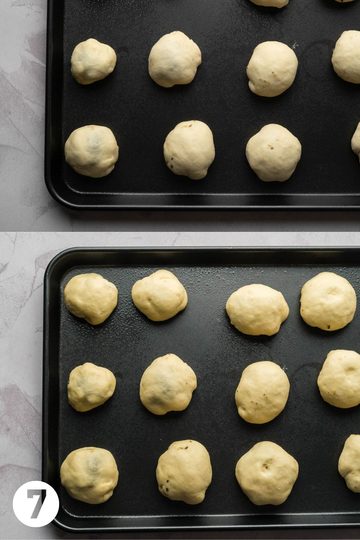
Step #7: Place the filled dough seam side down on a well greased baking sheet, leaving one inch in between to allow space to rise. Allow 20 minutes to rise - you can see a before and after in this image.

Step #8: Bake for 15-18 minutes or until they just start to turn a golden brown. Enjoy!
How to serve meat buns at each stage
4-12 months
This meat bun recipe is not recommended at this age because it's quite complex and a mixed texture. Instead, consider offering your baby the beef filling without the added salt! It's the perfect texture for a young eater and you can easily mash it further if necessary.
Or you can offer your baby our delicious sumac beef or this one pot sofrito beef, beans and rice recipe! All you need to do is modify the texture and we teach you exactly what to do in each blog post.
Toddlers
Depending on your toddler's age and ability you can serve the meat bun whole, sliced in half or in tiny bite sized pieces. Tune into your child and their unique feeding capabilities. Most of all, make sure you model how to take bites and chew the meat bun especially if it's new to your child.
Rest of the family
Serve these meat buns exactly as the recipe suggests! We love to serve our meat buns alongside a few servings of vegetables to help round it out. Jessica's family will nearly always enjoy them with a bowl of borscht!
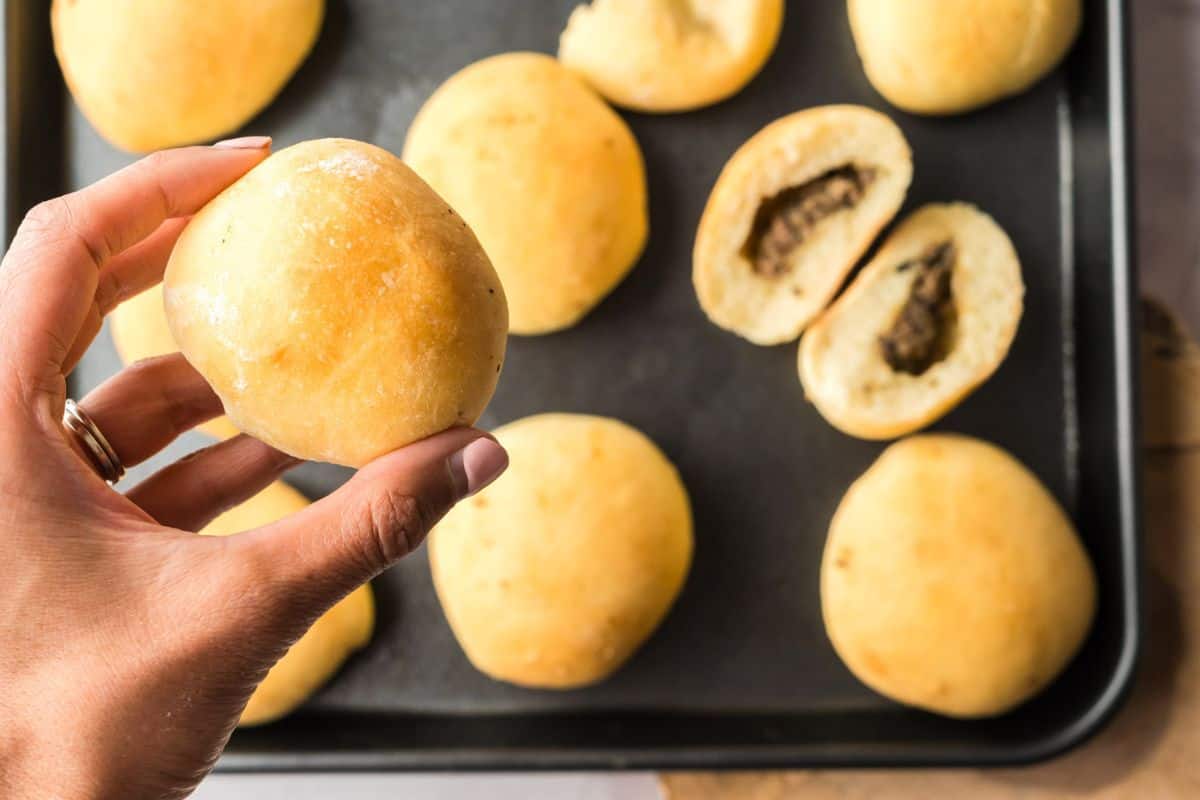
Mennonite Meat Buns with Lentils FAQs:
There are several reasons why dough may not rise adequately. Perhaps the yeast is no longer active. Or the milk was too hot and killed the yeast. Or the kitchen is cold- you can place the bowl of dough in the oven (turned off) with the light on to give it a bit more heat.
If you find your dough is really sticky and difficult to work with, it's likely you haven't added enough flour. There are so many factors that can impact the dough including the temperature and humidity! If it's sticky after rising, you can still work with it. Dust a plate with a bit of flour. When you take a ball of dough to stretch out, pat it in the flour first.
Yes, absolutely. That's the best thing about these meat buns! To freeze, just place the buns, once fully cooled, into a resealable freezer bag. The buns must be fully cooled or else condensation will form on the bags.
Freeze for up to 3 months in your fridge freezer or 6 months if you have a deep freezer.
Place the meat buns on a paper towel lined plate. Microwave briefly (depending on the power of your microwave). Then flip the buns over, and microwave again briefly. The paper towel will absorb any condensation that has formed on the buns and prevent them from getting soggy. Only defrost as many as you plan to eat.
Yes! Simply toss a couple straight from the freezer into your child's lunch box, wrapped in a paper towel to absorb condensation as they thaw. Add an ice pack and use an insulated lunch bag.
More "meat factor" recipes



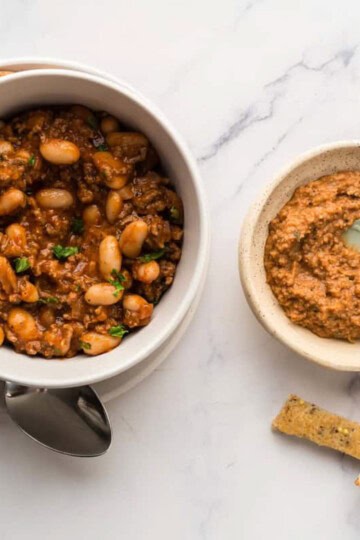
If you tried these Mennonite Meat Buns with Lentils or any other recipe on our blog, please leave a 🌟 star rating and let us know how it went in the 📝 comments below. Thanks for visiting!
Mennonite Meat Buns with Lentils
Video
Ingredients
Meat Filling
- 200 g about ½ lb mushrooms
- 1 large onion about the size of an adult fist
- 1 ½ lbs ground beef lean
- 1 teaspoon garlic powder
- 1 teaspoon salt
- ½ cup dried red lentils
- ¾ to 1 cup water
- 2 tablespoon dehydrated chopped onion
- 2 tablespoon nutritional yeast
- 1 tablespoon beef bouillon paste such as the Better Than Bouillon brand
- 2 tablespoon milk
- 2 tablespoon cornstarch
Dough:
- 3 ¼ cup milk
- 1 cup oil canola or other neutral tasting oil
- 2 eggs
- 1 tablespoon sugar
- 2 teaspoon salt
- 2 tablespoons instant yeast
- 8 to 10 cups all purpose flour
Instructions
To Make The Filling
- Pulse the mushrooms in a food processor until you get small, rice size pieces.
- Do the same for the onion. Slice into quarters before adding to the food processor.
- In a large (12 inch+) skillet, add mushrooms, onions, ground beef, garlic powder, and salt.
- Crumble fry (break the ground beef apart into crumbles as it cooks) on medium heat until the ground beef is cooked through (no longer pink).
- Add the lentils, ¾ cup water, dehydrated chopped onion, nutritional yeast, and beef bouillon paste.
- Reduce heat to low.
- Cover and simmer until the lentils are soft and blend into the meat (about 15 minutes). Stir every few minutes and add a few tablespoons of water at a time, if needed, to cook the lentils.
- Stir together the milk and the cornstarch.
- Once the lentils are cooked and most of the moisture has cooked away (the mixture is thick and paste-like, not soupy. You're looking for a filling that holds its shape on a spoon with no liquid pooling around it.), stir in the milk/cornstarch slurry and cook until the filling has thickened.
- Remove from heat and transfer to a container to cool completely in the fridge. A warm filling will prevent the dough from sealing. It should cool sufficiently while you move on to preparing the dough. The filling could also be made the day prior and kept in the fridge.
To Make The Dough
- Heat the milk until warm to the touch (like bath water), but not hot (around 110°F or 43°C). This can be done either in the microwave or in a pot on the stove.
- Meanwhile, add the oil, eggs, sugar, and salt to the bowl of a stand mixer. Mix with a fork by hand until combined.
- Slowly pour in the heated milk while whisking with the fork.
- Measure out 8 cups of flour and stir in the instant yeast.
- Add 4 cups of the yeast + flour mixture to the bowl of the stand mixer. Using the kneading hook, combine on low speed (some lumps are okay).
- Add the yeast/flour mix, one cup at a time, until you've added it all.
- At this point, slowly add a few tablespoons of additional flour at a time until you get a dough that's soft and slightly tacky, but doesn't stick to your hands. If your mixer struggles or the dough climbs up the hook, finish kneading by hand.
- Cover the bowl with a tea towel.
- Allow to rise on the counter until doubled (about 45-60 minutes). If your house is cold, you can turn the light on in the oven and place it inside to rise.
To Assemble the Buns:
- Using a 1 tablespoon size cookie scoop, pre-scoop the meat filling. You should get about 75 scoops.
- Divide the dough into 75 pieces, about 30g each, roughly the size of a ping pong ball. If you're not weighing, cut the dough in half, then each half into quarters, then divide each piece into about nine or ten.
- Cover the dough pieces with a tea towel to prevent them from drying out.
- Flatten each into a three-inch disc. If the dough is sticky, keep a small amount of flour on a plate. Dab the piece of dough in the flour and flatten.
- Place a scoop of filling in the centre and pull the dough up and around and pinch together to seal.
- Place the filled dough seam side down on a well greased baking sheet, leaving one inch in between to allow space to rise.
- Cover with a tea towel and place in a warm spot.
- Preheat the oven to 400° F.
- Allow the buns to rise for about 20 minutes or until the buns are puffy. You'll know they're ready when you gently press an indent with your finger and it fills back in slowly instead of quickly.
- Bake for 15-18 minutes or until they just start to turn a golden brown.
- Cool completely on cooling racks. Then place into plastic zip bags and freeze. To reheat: place the buns on a paper towel lined plate to absorb the moisture and microwave, flipping once.