The Best Easy Peanut Butter Blossom Cookies for Toddlers [one bowl, low sugar]
This blog post is written in proud and paid partnership with our friends at Canadian Sugar Institute We can’t wait for you to dive into this one!
A lower sugar twist on the classic holiday recipe for peanut butter blossoms. Perfect for toddlers or anyone who likes cute food!
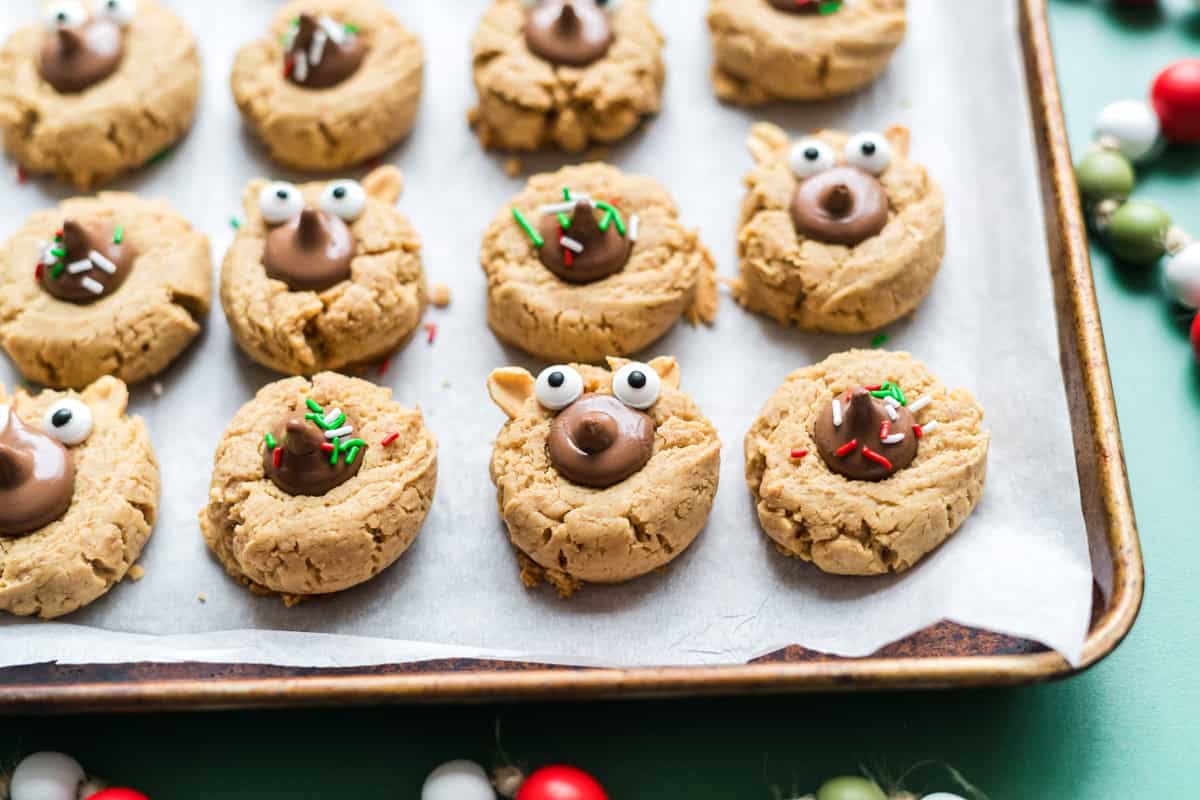
We decided to take the classic Peanut Butter Blossoms holiday cookie and make a kid-friendly version!
More on what makes it kid-friendly later but first - we can't stop fawning over how cuuuute these little cookie bears turned out! Our kids are out of the preschool stage now, but they still got a kick out of them!
And while they have a high impact, the cuteness factor doesn't take a lot of work. With only a couple of peanuts and googly eyes, you can make your kids' day.
Plus, you can feel assured that these cookies won't break the sugar bank.
Did that make sense to you?
That probably needs an explanation… Sometimes we like to think of the sugar recommendations like a bank account. Each day your child gets x amount of added sugar to consume. This can be withdrawn anytime your child eats a candy, cookie, sweetened yogurt, ketchup, etc (not that we need to keep track of every little gram).
Each cookie (without a kiss) has about 4g of added sugar. For the average child (who consumes 1300 calories a day), that would be about 1% of daily calories coming from added sugar. A cookie with a kiss has 6g of added sugar. This fits in with the recommendation to keep added sugars below 10% of total calories.
That's what makes these cookies kid-friendly - they're lower in sugar! We couldn't just completely cut out the sugar though - because sugar does more in baking than simply add sweetness.
If having lower sugar for snacks and desserts is up your alley you'll really want to set aside time to prepare a batch of these animal oat crackers which will bring up really fun childhood memories. This fruit pizza is a classic and we managed to reduce the sugar by 50% compared to other recipes we researched. And one more: this prune breakfast cookie actually has NO added sugar and it's a a winner in our home for reasons than one...keeps the kids regular!
Jump to:

So…what exactly is the role of sugar in baking?
Sugar…(like most moms) is a multitasker in baking, doing much more than simply adding sweetness to your cookies and cakes. We often find as Dietitians people have a really negative perspective when it comes to the sweet stuff, and while we are all for health recommendations, it's important to recognize sugar plays a key role.
Once upon a time when we were in Foods Lab, an actual course* where we cooked a variety of foods and used different cooking methods, we learned sooooo much about the culinary, scientific, and technical role of sugar in certain recipes.
We consider it a privilege to have that knowledge, especially since we love recipe development.
Back to the sweet stuff, here's a breakdown of sugar's key roles in baking-we're really only scratching the surface here!
Flavour Balance: Sugar not only provides sweetness but also enhances and balances other flavors in baked goods, like bringing out the richness of peanut butter in our peanut butter blossoms.
Texture and Mouthfeel: It's the secret behind the soft, tender bite of cookies and cakes. Sugar absorbs moisture, keeping baked goods moist and preventing them from drying out too quickly.
Volume: Sugar plays a role in creating structure. When creamed with butter, sugar helps incorporate air into the dough or batter, resulting in taller, fluffier, or softer baked goods.
Colour: Sugar contributes to the appealing golden-brown color we love in baked goods. This happens through caramelization, where sugar reacts with heat, and the Maillard reaction, which occurs when sugar interacts with proteins.
So, the next time you completely omit sugar from a recipe and find it's really hard, dry and possibly not tasty…this might be why!
*officially the class was called Food Preparation and Preservation, but everyone just called it Foods Lab!
What's the difference between white sugar and brown sugar?
First - we need a little primer on simple sugars.
There are two main simple sugar units: glucose and fructose. When these are joined together, they form sucrose.
White sugar (aka what you buy in a bag at the grocery store) is almost pure sucrose and can go by various names, depending on its granule size: granulated sugar, coarse sugar, pearl sugar, and superfine sugar. White sugar is extracted from either sugar cane or sugar beets. Regardless of the source material, the end product is the same.
If white sugar is dissolved in water, it's called liquid sugar.
Icing sugar is simply white sugar that has been ground down to a powder and has a bit of cornstarch mixed in to prevent clumping.
Brown sugar is white sugar with the addition of molasses, which gives it a rich, caramel flavor and added moisture. It includes: dark brown sugar, yellow sugar, and light brown/golden sugar.
When it comes to nutrition, you might be surprised to learn that their differences are marginal! While brown sugar contains trace minerals from molasses, the difference is negligible.
Are honey and maple syrup healthier than sugar?
White sugar and brown sugar are staples in baking, but other sweeteners like honey and maple syrup often get attention for possibly being "healthier." Let's break it all down…you might be surprised with what you learn!
Honey contains about 18% water and 80% sugar. Its sugar content is 50% fructose, 46.5% glucose, + a bit of sucrose and other simple sugars. The remaining 2% is composed of vitamins, minerals, pollen, and protein.
An important thing to keep in mind - honey should never be fed to children under twelve months, due to the risk of infant botulism.
Maple Syrup has about 33% water and 65% sugar, which is nearly all sucrose. The remaining 2% is also composed of vitamins and minerals.
So yes, while honey and maple syrup do contain some vitamins and minerals, it's nothing to call home about.
One more thing - both honey and maple syrup have a distinct flavor. So in some recipes, it really is just pure magic and in other recipes it might not be what you're looking for!
There always seems to be "new" sugars popping up on the market - coconut sugar, agave syrup, etc. The main thing to remember is that all plants produce sugar - so it's possible to extract it from nearly anything! But you end up with much the same thing: a combination of glucose, fructose, and sucrose.
When it comes to the classification of sugars for nutritional purposes, these are all considered added sugars. One of our pet peeves is when we see a post on Pinterest that claims a recipe has "no added sugar" but when we click through we discover it contains maple syrup!

What are some basic tips to make baking less sweet?
Since children have specific nutrient needs to optimize their growth and development, it's recommended to keep the foods they eat that contain added sugar to a minimum (ie: less than 10% of their total daily calories). This is simply because the sugar may take up room in their appetite and crowd out other foods that contain the nutrients they need to grow, such as protein, iron, calcium - just to name a few! Additionally, there are dental health benefits from keeping added sugars to a minimum.
And if your child is under two, it's recommended to avoid offering them foods with any added sugars.
In order for your kids to "have their cake and eat it too," so to speak, here are some ways you can reduce the added sugars in recipes:
Simply Reduce The Sugar
A general rule of thumb is that you can reduce the sugar in a recipe by 30% without compromising the functional role sugar is playing. Remember- this only works for recipes that haven't already been developed to be lower in sugar.
Substitute Refined Sugar for Whole Foods
This is more of an advanced move, but if you feel comfortable experimenting in the kitchen, you can swap out the sugar for ingredients such as:
- Bananas
- Applesauce
- Dates
- Molasses -this has a strong flavour, so a little goes a long way!
As an example, we cut down the sugar and used mashed bananas in these Banana Zucchini Carrot Muffins.

You may be interested in…
- How to spot sugar in your child's diet (and why it matters)
- Babies, sweets, and sugar - the 411
Recipe FAQs
When can I offer this recipe to my child?
Technically, this recipe is recommended for children ages 2 and up. This is largely because up until 24 months, the recommendation for added sugar is actually zero. If you want to learn more about the nuance in this recommendation, then definitely read this post for our dietitian + realistic mom approach.
The peanut bear ears should only be offered to children aged 4+ up as whole peanuts are a choking hazard. Same goes with the candied googly eyes!
Can I use regular or natural peanut butter?
Yes! If you have "regular" peanut butter at home, please feel free to use it in this recipe. The primary difference is that it will be just a touch sweeter. Families we work with are always surprised to learn that the sugar difference between regular or natural peanut butter is minuscule.
What if my child has a peanut allergy?
First, we're so sorry. Allergies to any food is so challenging and adds a new level of unease when it comes to parenting.
While we haven't tested it ourselves we feel that typical nut butter replacements would work perfectly in this recipe such as Wowbutter, Sunbutter or even Almond Butter if your child can tolerate tree nuts.
Remind me again… what makes these cookies kid-friendly?
Other than the obvious cuteness factor, here's how we adapted the recipe with our kids in mind:
- We cut the sugar in half.
- We replaced some of the all-purpose flour with whole wheat flour.


Peanut Butter Blossom Bears
Ingredients
- ¾ cup natural peanut butter *see note
- ½ cup unsalted butter softened
- ½ cup packed light brown sugar
- 2 large eggs room temperature
- ½ teaspoon vanilla extract
- 1 cup all-purpose flour
- 1 cup whole wheat flour
- ½ teaspoon baking soda
- ¼ teaspoon salt
- 25-30 Hersey's chocolate kisses unwrapped
- Optional garnish: peanuts candy googly eyes, & sprinkles
Instructions
- Preheat the oven to 350°F.
- Using a hand or stand mixer, cream together the peanut butter, butter, and brown sugar.
- Add in the eggs and vanilla extract. Continue mixing until light and fluffy.
- Add in the all-purpose flour, whole wheat flour, baking soda, and salt. Mix until combined.
- Using an 1.5 tablespoon size cookie scoop, place scoops of cookie dough on a parchment lined baking sheet, keeping a one inch distance in between. Alternatively, you can roll into balls using your hands.
- Flatten the tops of the balls of cookie dough with a drinking glass.
- Bake for 8-11 minutes in the preheated oven.
- Remove baked cookies from the oven and immediately press a Hershey's kiss into the centre of each cookie *see note.
- While warm and still soft, decorate with sprinkles, or turn them into cute little bears by adding candy googly eyes and two peanut halves for ears.


These are so cute! I’m so happy to have a holiday recipe I can make with my little guy.
These are adorable! Love that it's a classic take on a recipe, but with less sugar! I think we'll make this all year.
Loved making these with my nieces! They thought it was so fun! I love that they're lower sugar.
I'm very interested in this recipe - do you think wow butter would work here? toddler doesn't have peanut allergies but her dad does!
thanks 🙂
Ah! We haven't tried it with wowbutter just yet - but if you do, please let us know how it goes. We suspect it will work out VERY similar apart from the taste of course.